Prep Time: 15 minutes | Set Time: 1 hour | Total Time: 1 hour 15 minutes
Difficulty: Easy | Effort: Minimal | Yield: 12 bars
Introduction
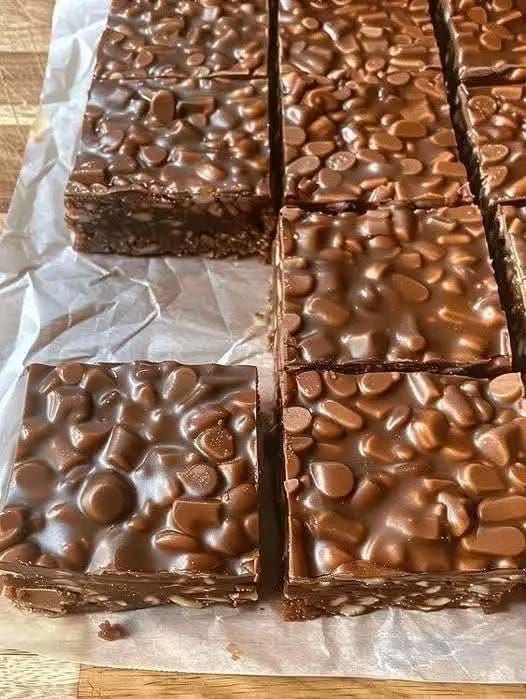
Craving something sweet, crunchy, and deeply chocolatey but don’t want to turn on the oven? These Homemade No-Bake Chocolate Crunch Bars are your perfect solution. Combining rich dark chocolate, creamy peanut butter, and the satisfying crunch of toasted rice cereal, this recipe comes together in one bowl and sets in the fridge. They’re the ideal make-ahead treat for lunchboxes, after-school snacks, or a quick dessert that feels indulgent yet is surprisingly simple. With no baking required, they’re a lifesaver during hot weather or when you need a sweet fix in a flash.
Nutritional Information (Per Bar)
Calories: 235 | Total Fat: 14g | Saturated Fat: 7g | Trans Fat: 0g
Cholesterol: 1mg | Sodium: 95mg | Total Carbohydrates: 26g | Dietary Fiber: 2g
Sugars: 17g | Protein: 4g
Note: Nutritional values are estimates based on the specific ingredients listed. Values may vary with substitutions.
Ingredients
For the Crunch Base & Topping:
-
2 cups (200g) crisp rice cereal (e.g., Rice Krispies)
-
1 ½ cups (180g) quick-cooking oats (certified gluten-free if needed)
-
½ cup (70g) roasted, salted peanuts, roughly chopped
-
⅓ cup (45g) hemp seeds or chia seeds (optional, for added nutrition)
-
1 pinch of fine sea salt
For the Chocolate-Peanut Butter Binding:
-
1 ¼ cups (210g) high-quality dark chocolate chips or chopped baking chocolate (60-70% cocoa)
-
⅔ cup (165g) smooth, natural peanut butter (well-stirred)
-
⅓ cup (80ml) pure maple syrup or agave nectar
-
1 teaspoon pure vanilla extract
Optional Add-ins & Toppings:
-
Flaky sea salt for sprinkling
-
2 tablespoons melted peanut butter for drizzling
Equipment Needed
-
8×8 inch (20×20 cm) square baking pan
-
Parchment paper
-
Large heatproof mixing bowl
-
Medium saucepan or heatproof bowl for double boiler
-
Spatula
-
Measuring cups and spoons
Step-by-Step Instructions
Step 1: Prepare the Pan
Line your 8×8 inch pan with a sheet of parchment paper, leaving some overhang on two opposite sides. This “sling” will make it incredibly easy to lift the entire set block out of the pan later for clean cutting. Lightly grease the exposed sides of the pan with a neutral oil or cooking spray.
Step 2: Mix the Dry Ingredients
In your large mixing bowl, combine the crisp rice cereal, quick oats, chopped peanuts, hemp/chia seeds (if using), and the pinch of salt. Stir with a spatula until everything is evenly distributed. Set aside.
Step 3: Create the Chocolate Binding
This is a one-pot process. Choose your method:
-
Saucepan Method: Combine the chocolate chips, peanut butter, and maple syrup in a medium saucepan. Place over low heat, stirring constantly with a spatula until the chocolate is completely melted and the mixture is smooth, glossy, and uniform. This should take 3-5 minutes. Do not let it boil.
-
Double Boiler Method: If worried about scorching, place the ingredients in a heatproof bowl set over a pot of simmering water (ensure the bowl doesn’t touch the water). Stir until melted and smooth.
Once melted, remove from heat immediately and stir in the vanilla extract.
Step 4: Combine & Press
Pour the warm, liquid chocolate mixture over the bowl of dry ingredients. Using your spatula, fold and stir until every single piece of cereal and oat is thoroughly coated in the chocolate-peanut butter magic.
Transfer the mixture to your prepared pan. Use the spatula, and then your fingers or the bottom of a flat glass (lightly greased), to press the mixture down firmly and evenly into an compact, uniform layer. This firm press is crucial for bars that hold together.
Step 5: Add Finishing Touches & Set
If desired, sprinkle the top with a few flakes of sea salt and drizzle with extra melted peanut butter. This not only looks professional but adds great flavor contrast.
Place the pan, uncovered, in the refrigerator. Allow the bars to chill and set completely for at least 1 hour. For a firmer, cleaner-cut bar, you can leave them for 2-3 hours or overnight.
Step 6: Slice & Serve
Using the parchment paper sling, carefully lift the entire block out of the pan and onto a cutting board. With a sharp knife, slice into 12 rectangular bars (or 16 squares for smaller portions). For the cleanest cuts, wipe the knife with a hot, damp towel between slices.