Prep Time: 20 minutes
Chill Time: Minimum 4 hours (or overnight)
Total Time: 4 hours 20 minutes
Intensity (Difficulty): Easy (Ideal for beginner cooks)
Servings: 9-12 servings
Dietary Info: Contains dairy, gluten (can be made gluten-free with GF crackers), and eggs.
Why You’ll Love This Recipe
So Easy: No baking means no worrying about ovens or water baths. It’s a foolproof recipe that comes together in minutes.
Make-Ahead Magic: This dessert needs time to set in the fridge, making it the perfect dish to prepare a day in advance. The flavors meld beautifully overnight.
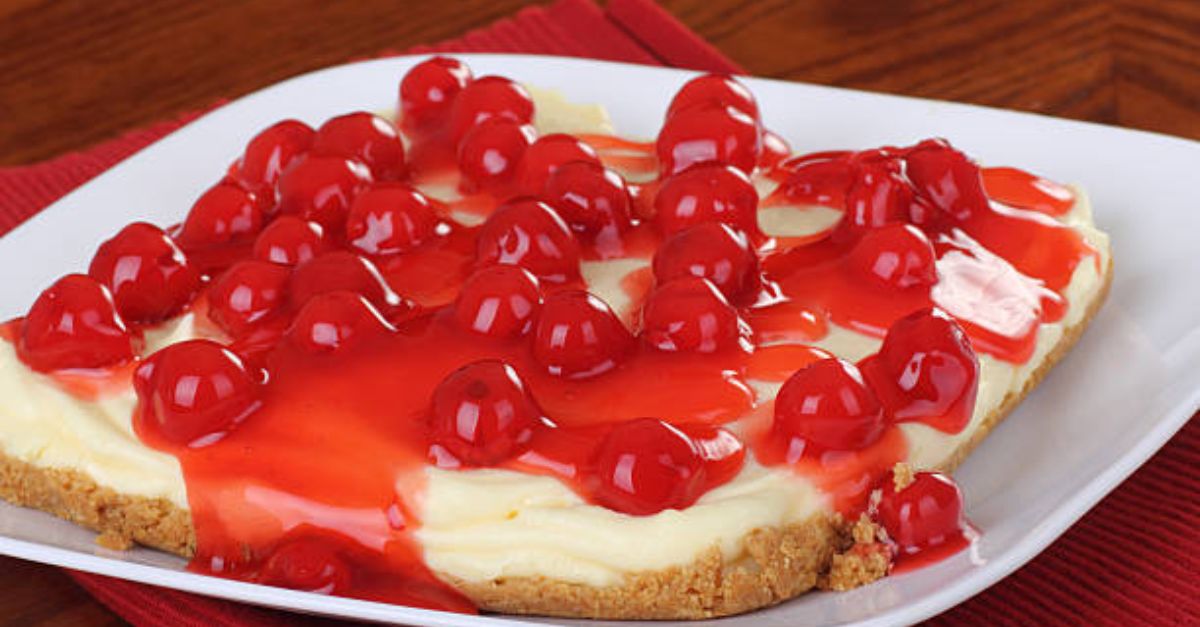
Perfect Texture: The combination of the crisp crust, the light and airy cream cheese filling, and the thick, fruity topping is pure perfection in every bite.
Always a Crowd-Pleaser: It’s a nostalgic dessert that everyone loves. It’s familiar, comforting, and absolutely delicious.
Ingredients
For the Graham Cracker Crust:
2 cups (240g) graham cracker crumbs (about 16-18 full sheets)
1/3 cup (65g) granulated sugar
1/2 cup (1 stick / 115g) unsalted butter, melted
Pinch of salt
For the Cream Cheese Filling:
1 package (8 oz / 225g) full-fat cream cheese, softened to room temperature
1 cup (120g) powdered sugar
1 teaspoon vanilla extract
1 1/2 cups (360ml) heavy whipping cream, cold
For the Cherry Topping:
1 can (21 oz / 595g) cherry pie filling (or homemade, see notes)
Instructions
Step 1: Make the Crust
In a medium-sized bowl, combine the graham cracker crumbs, granulated sugar, and a pinch of salt. Stir with a fork until everything is evenly distributed.
Pour the melted butter over the crumb mixture. Stir thoroughly until all the crumbs are moistened and the mixture resembles wet sand.
Transfer the mixture to an 8×8 or 9×9-inch square baking dish (or a 9-inch pie plate). Press the crumbs firmly and evenly into the bottom of the dish. To get a really tight, even crust, use the flat bottom of a measuring cup or a drinking glass.
Place the crust in the refrigerator to set while you prepare the filling, for at least 15 minutes.
Step 2: Make the Cream Cheese Filling
In a large mixing bowl (or the bowl of a stand mixer fitted with the paddle attachment), beat the softened cream cheese with an electric hand mixer until it’s completely smooth and free of lumps.
Add the powdered sugar and vanilla extract. Beat again until the mixture is smooth, light, and creamy. Scrape down the sides and bottom of the bowl with a spatula to ensure everything is well incorporated.
In a separate, clean, and cold bowl (preferably metal or glass), pour the cold heavy whipping cream. Using the electric mixer with the whisk attachments (clean them first!), whip the cream on medium-high speed. Whip until stiff peaks form. This means when you lift the beater, the cream stands up in a peak that doesn’t flop over. Be careful not to over-whip, or it will turn into butter.
Gently fold about one-third of the whipped cream into the cream cheese mixture to lighten it. Then, add the remaining whipped cream and fold gently with a rubber spatula until no white streaks remain. The goal is to keep as much air in the mixture as possible for a light, mousse-like texture.
Step 3: Assemble the Dessert
Retrieve the chilled crust from the refrigerator.
Spoon the creamy filling over the crust. Gently spread it into an even layer.
Carefully spoon the cherry pie filling over the cream cheese layer. You can spread it evenly for full coverage, or leave a few small dollops of white peeking through for a rustic look.
Cover the dish loosely with plastic wrap or aluminum foil.
Step 4: Chill and Serve
Refrigerate the dessert for at least 4 hours, but overnight is best. This allows the filling to set up firmly so you can cut clean, beautiful squares.
When ready to serve, use a sharp knife to cut into squares. For the cleanest cuts, wipe the knife clean between each slice.
Serve cold, straight from the fridge.
Tips for the Perfect Cherry Delight
Room Temperature is Key: Make sure your cream cheese is truly at room temperature. If it’s too cold, you’ll end up with a lumpy filling. Take it out of the fridge at least an hour before you start.
Cold Cream: For the whipped cream to whip properly, the cream needs to be very cold, and your bowl and beaters should be too. You can even pop your bowl and beaters in the freezer for 10 minutes before whipping.
Stiff Peaks: Don’t just whip your cream to soft peaks. For a filling that holds its shape and cuts cleanly, you need stiff peaks. This extra structure is what allows the dessert to be sliced.
Make It Your Own: This recipe is wonderfully versatile!
Different Fruit: Swap the cherry pie filling for blueberry, strawberry, apple, or peach pie filling.
Chocolate Version: Use a chocolate cookie crust (like Oreo crumbs) and top with chocolate pudding or a chocolate ganache.
Citrus Zest: Add a teaspoon of lemon or orange zest to the cream cheese filling for a bright, fresh flavor.
Storage
Store any leftovers covered in the refrigerator for up to 3-4 days. The crust may soften slightly over time, but it will still be delicious. This dessert is not recommended for freezing, as the texture of the cream cheese filling and cherry topping can become watery upon thawing.
Nutrition Information
Please note: The following nutrition information is an estimate and is provided for informational purposes only. It can vary significantly based on the specific brands of ingredients used (e.g., reduced-fat cream cheese, type of whipped cream, brand of pie filling).
Serving Size: 1 square (assuming 9 servings)
Calories: Approximately 480-520 kcal
Total Fat: 28-32g
Saturated Fat: 17-20g
Cholesterol: 95-115mg
Sodium: 240-280mg
Total Carbohydrates: 50-55g
Dietary Fiber: 1-2g
Sugars: 38-43g (includes added and natural sugars)
Protein: 4-5g