Total Time: 1 hour 15 minutes (Active: 15 minutes | Inactive: 1 hour)
Difficulty Level: Easy
Yield: One 9-inch round cake (12 servings)
A Note From Our Kitchen
This Condensed Milk Cake is the epitome of simple elegance. Born from pantry staples, it delivers a luxuriously moist, dense-yet-soft crumb and a beautiful golden crust with a subtle caramelized flavor, thanks to the star ingredient: sweetened condensed milk. It requires no fancy equipment, no complex steps, and is famously forgiving. This is the cake you whip up for an unexpected visitor, a last-minute potluck, or a quiet afternoon treat with a cup of tea. It’s a beloved classic across many cultures for a very good reason—it’s absolutely divine.
Recipe Details
-
Prep Time: 15 minutes
-
Cook Time: 50-60 minutes
-
Cooling Time: At least 1 hour (highly recommended)
-
Skill Level: Beginner-Friendly
-
Course: Dessert, Tea Cake
-
Cuisine: International
Ingredients
For the Cake:
-
1 can (14 oz / 397g) full-fat sweetened condensed milk
-
4 large eggs, at room temperature
-
1/2 cup (113g) unsalted butter, melted and slightly cooled
-
1 teaspoon pure vanilla extract
-
1 ½ cups (190g) all-purpose flour, spooned and leveled
-
2 teaspoons baking powder
-
1/4 teaspoon salt
For the Optional Glaze:
-
1/2 cup (60g) powdered sugar, sifted
-
1-2 tablespoons milk or lemon juice
-
1/4 teaspoon vanilla extract
Equipment:
-
9-inch round cake pan
-
Parchment paper
-
Mixing bowls (or just one large bowl!)
-
Whisk and spatula
-
Cooling rack
Step-by-Step Instructions
Step 1: Prepare & Preheat (5 min)
Preheat your oven to 350°F (175°C). Grease a 9-inch round cake pan generously with butter or non-stick spray. Line the bottom with a circle of parchment paper for foolproof removal later.
Step 2: Mix the Wet Ingredients (5 min)
In a large mixing bowl, pour in the entire can of sweetened condensed milk. Add the room-temperature eggs one at a time, whisking well after each until the mixture is smooth and homogeneous. Slowly whisk in the melted (but not hot) butter and the vanilla extract. Your mixture will be thick, creamy, and pale yellow.
Step 3: Incorporate the Dry Ingredients (5 min)
Sift the flour, baking powder, and salt directly over the wet ingredients. Using a spatula or whisk, gently fold the dry ingredients into the wet until just combined. Do not overmix! A few small lumps are perfectly fine. Overmixing will develop the gluten and make the cake tough.
Step 4: Bake to Golden Perfection (50-60 min)
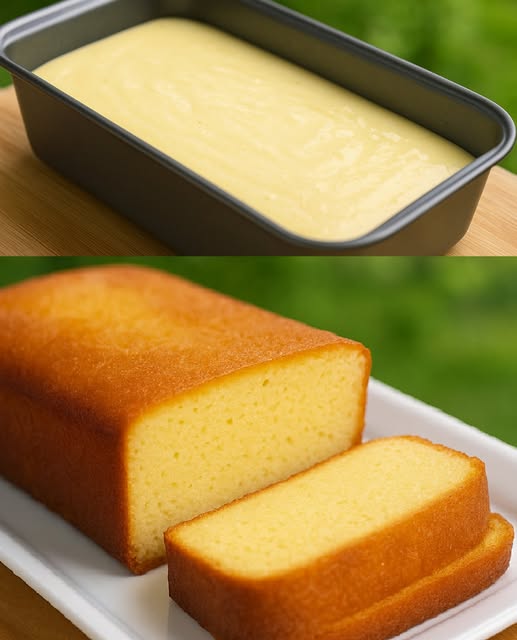
Pour the thick, luscious batter into your prepared pan and smooth the top with the spatula. Place in the center of the preheated oven.
Bake for 50 to 60 minutes. The cake is done when it is a deep golden brown on top, the edges pull away slightly from the pan, and a toothpick or skewer inserted into the center comes out clean or with a few moist crumbs (not wet batter).
Pro-Tip: If the top is browning too quickly, loosely tent it with aluminum foil for the last 15-20 minutes of baking.
Step 5: The Crucial Cool (1 hour+)
Remove the cake from the oven and let it cool in the pan on a wire rack for 15 minutes. This allows the structure to set. Then, run a knife around the edges, invert the cake onto the rack, peel off the parchment paper, and flip it right-side-up to cool completely. This cake is best served at room temperature. The texture settles and becomes perfectly moist as it cools.
Step 6: Optional Glaze & Serve (5 min)
If using the glaze, whisk the sifted powdered sugar with 1 tablespoon of milk or lemon juice and vanilla. Add more liquid a few drops at a time until you reach a drizzle-able consistency. Drizzle artfully over the completely cooled cake. Slice and serve.
Storage & Lasting Quality
-
Room Temperature: Store in an airtight container at room temperature for up to 3 days.
-
Refrigerator: For longer storage, refrigerate for up to 5 days. Let slices come to room temperature before serving for the best texture and flavor.
-
Freezer: This cake freezes beautifully. Wrap the whole cake or individual slices tightly in plastic wrap and then in foil. Freeze for up to 2 months. Thaw overnight in the refrigerator.
The Last Slice: This cake doesn’t just survive; it thrives. On day two and three, the flavors meld and the crumb becomes even more tender and cohesive. It’s a cake that rewards a little patience.
Nutrition Information
*(Per serving, based on 12 servings without glaze. Glaze will add approximately 20-25 calories and 5g sugar per serving.)*
| Nutrient | Amount |
|---|---|
| Calories | ~ 290 kcal |
| Total Fat | 12g |
| – Saturated Fat | 7g |
| Cholesterol | 95mg |
| Sodium | 150mg |
| Total Carbohydrates | 38g |
| – Dietary Fiber | 0.5g |
| – Sugars | 24g |
| Protein | 6g |