Prep Time: 15 minutes
Cook Time: 50 minutes
Cooling Time: 2 hours
Total Time: 3 hours 5 minutes
Servings: 12 slices
Difficulty: Easy
Dietary Specifications: Gluten-Free, Grain-Free, Sugar-Free, Keto-Friendly
Introduction
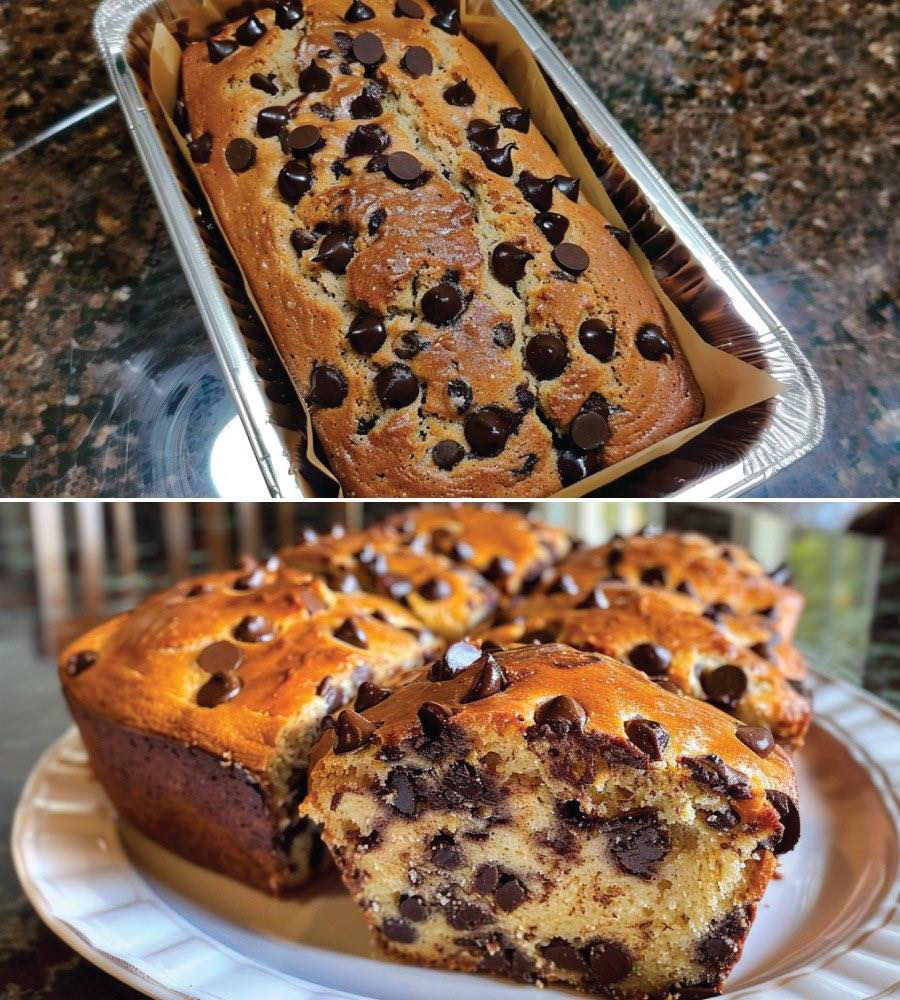
Craving the warm, comforting aroma of freshly baked bread without the carb-heavy consequences? This Keto Chocolate Chip Bread is your answer. Perfectly moist, subtly sweet, and studded with melty sugar-free chocolate chips, this bread is a game-changer for anyone following a ketogenic or low-carb lifestyle. It’s ideal for a quick breakfast, a satisfying afternoon snack with a cup of coffee, or a guilt-free dessert. With a straightforward method and simple ingredients, you can enjoy the bliss of homemade baking while staying firmly within your macros.
Nutritional Information (Per Slice)
-
Calories: 218 kcal
-
Total Fat: 19g
-
Saturated Fat: 8g
-
Total Carbohydrates: 7g
-
Dietary Fiber: 4g
-
Net Carbs: 3g
-
Protein: 7g
-
Cholesterol: 71mg
-
Sodium: 210mg
Net carbs are calculated by subtracting dietary fiber and sugar alcohols (from chocolate chips) from total carbohydrates. Individual results may vary based on specific brands used.
Recipe Intensity & Notes
-
Skill Level: Beginner
-
Equipment Needs: Basic (mixing bowls, loaf pan, hand mixer or whisk)
-
Key Success Factors: Do not overmix the batter; ensure ingredients are at room temperature for best emulsion; allow bread to cool completely before slicing to prevent crumbling.
-
Taste Profile: Rich, buttery, and indulgent with a tender, cake-like crumb and bursts of chocolate.
-
Meal Prep Friendly: Yes! Stores beautifully for a quick breakfast all week.
Ingredients
Dry Ingredients
-
2 cups (200g) Blanched Almond Flour, finely ground
-
⅓ cup (35g) Coconut Flour
-
⅓ cup (65g) Granulated Erythritol or Monk Fruit Sweetener (see note)
-
2 tsp Baking Powder (aluminum-free)
-
½ tsp Sea Salt
-
¾ cup (140g) Sugar-Free Dark Chocolate Chips (like Lily’s or ChocZero)
Wet Ingredients
-
4 large Eggs, at room temperature
-
½ cup (115g) Unsalted Butter, melted and slightly cooled (or coconut oil for dairy-free)
-
½ cup (120ml) Unsweetened Almond Milk (or any nut milk)
-
1 tsp Pure Vanilla Extract
Optional Add-Ins
-
½ cup chopped Walnuts or Pecans
-
1 tsp cinnamon for a spiced variation
Equipment
-
9×5 inch Loaf Pan
-
Parchment Paper
-
Mixing Bowls (2 medium)
-
Whisk or Hand Mixer
-
Spatula
-
Cooling Rack
Instructions
Step 1: Preparation (5 mins)
-
Preheat your oven to 350°F (175°C).
-
Line your 9×5 inch loaf pan with parchment paper, allowing some overhang on the long sides for easy removal. Lightly grease any exposed parts of the pan.
-
Ensure all refrigerated ingredients (eggs, almond milk, butter) are at room temperature. This prevents the melted butter from solidifying when mixed and ensures a smoother batter.
Step 2: Combine Dry Ingredients (3 mins)
In a medium mixing bowl, whisk together the almond flour, coconut flour, granulated sweetener, baking powder, and salt until no lumps remain and the mixture is uniform. Stir in ½ cup of the sugar-free chocolate chips (reserving ¼ cup for the top). This coating helps prevent the chips from sinking during baking.
Step 3: Combine Wet Ingredients (4 mins)
In a separate bowl, whisk the eggs vigorously for about 30 seconds until slightly frothy. Add the melted (and cooled) butter, almond milk, and vanilla extract. Whisk until the mixture is completely smooth and well emulsified.
Step 4: Form the Batter (3 mins)
Create a well in the center of the dry ingredients. Pour the wet mixture into the well. Using a spatula or spoon, gently fold the ingredients together until just combined. A few streaks of flour are okay—do not overmix, as this can lead to dense bread. The batter will be thick and scoopable.
Step 5: Bake to Perfection (50-55 mins)
-
Scoop the batter into your prepared loaf pan, smoothing the top with the spatula.
-
Sprinkle the remaining ¼ cup of chocolate chips evenly over the top, gently pressing them in slightly.
-
Place the pan in the center of the preheated oven and bake for 50-55 minutes. The bread is done when the top is deep golden brown, firm to the touch, and a toothpick inserted into the center comes out clean or with a few dry crumbs (melted chocolate on the toothpick is fine!).
-
Crucial Step: If the top is browning too quickly after 30 minutes, loosely tent it with a piece of aluminum foil.
Step 6: Cool & Serve (2 hours)
-
Remove the pan from the oven and place it on a cooling rack. Let the bread cool in the pan for 20 minutes.
-
Using the parchment paper overhang, carefully lift the bread out of the pan and place it directly onto the cooling rack.
-
Allow the bread to cool completely, for at least 2 hours, before attempting to slice. This patience is key—the bread continues to set as it cools, resulting in perfect, non-crumbly slices.