-
Total Time: 45 minutes (15 minutes active, 30 minutes inactive)
-
Difficulty Level: Easy
-
Yield: 16 bars
-
Category: Dessert/Snack
-
Dietary Notes: Can be made gluten-free and vegan with substitutions
Introduction
These Homemade Crunch Bars capture the nostalgic magic of the classic candy bar with a wholesome, customizable twist. By making them at home, you control the ingredients, avoiding unnecessary additives while creating a perfect balance of silky dark chocolate and crisp, airy puffed rice. With just a handful of pantry staples and minimal active time, you’ll have a treat that’s both impressively delicious and surprisingly simple.
Ingredients
For the Bars:
-
12 ounces (about 2 cups) high-quality dark chocolate chips or chopped chocolate bar (60-70% cacao recommended)
-
3 tablespoons refined coconut oil, divided
-
1 teaspoon pure vanilla extract
-
A pinch of fine sea salt
-
2 ½ cups crispy rice cereal (ensure gluten-free if needed)
-
Optional add-ins: 2 tablespoons crushed pretzels, ¼ cup toasted chopped nuts, or 1 tablespoon flaky sea salt for topping
Equipment:
-
8×8 inch baking pan
-
Parchment paper
-
Double boiler or heatproof bowl set over a saucepan
-
Spatula
-
Measuring cups and spoons
Step-by-Step Instructions
Step 1: Prepare the Pan (Time: 5 minutes | Intensity: Low)
Line your 8×8 inch baking pan with parchment paper, allowing the edges to overhang slightly. This creates “handles” for easy removal later. Lightly grease the parchment with a tiny bit of the divided coconut oil. Set the pan aside.
Step 2: Melt the Chocolate Base (Time: 10 minutes | Intensity: Medium)
Create a double boiler by filling a saucepan with 1-2 inches of water and bringing it to a gentle simmer. Place a heatproof bowl on top, ensuring the bottom doesn’t touch the water. Add the chocolate chips and 2 tablespoons of coconut oil to the bowl. Stir frequently with a spatula until the mixture is completely smooth and glossy. Remove the bowl from the heat. Stir in the vanilla extract and the pinch of fine sea salt until fully incorporated.
Pro Tip: Melting slowly over indirect heat prevents the chocolate from seizing and ensures a silky texture.
Step 3: Combine and Set (Time: 5 minutes active, 30 minutes inactive | Intensity: Low)
Pour the crispy rice cereal into the melted chocolate. Using a gentle folding motion, coat every piece evenly, being careful not to crush the cereal. Once combined, immediately transfer the mixture to your prepared pan. Use the spatula to press it into an even, compact layer. If using, sprinkle with optional toppings like flaky sea salt and press gently to adhere.
Step 4: The Final Chill (Time: 30 minutes minimum | Intensity: None)
Place the pan in the refrigerator to set. Allow the bars to chill, undisturbed, for at least 30 minutes. For the cleanest cuts and firmest texture, chilling for 2 hours is ideal.
Step 5: Slice and Serve (Time: 5 minutes | Intensity: Low)
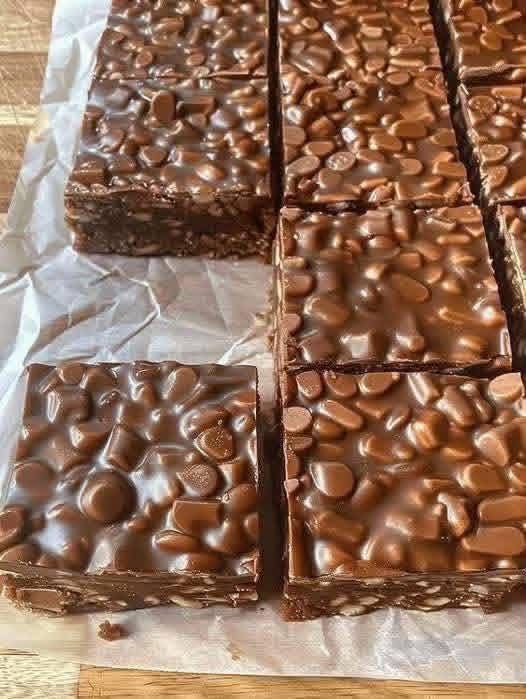
Once fully set, use the parchment paper to lift the entire slab from the pan. Place it on a cutting board. Using a sharp knife, slice into 16 even rectangles (4 rows by 4 columns). For a professional look, wipe the knife clean between cuts.
Storage & Serving Suggestions
Store Homemade Crunch Bars in an airtight container in the refrigerator for up to 2 weeks. They can also be frozen for up to 3 months; separate layers with parchment paper. For serving, let them sit at room temperature for 5 minutes to take the chill off, which optimizes the crisp texture and chocolate flavor. These bars are perfect for lunchboxes, dessert platters, or as a sweet homemade gift.
Nutrition Information (Per Bar)
Note: Nutrition is estimated based on the base recipe without optional add-ins.
-
Calories: 145 kcal
-
Total Fat: 10g
-
Saturated Fat: 7g
-
Cholesterol: 0mg
-
Sodium: 45mg
-
Total Carbohydrates: 15g
-
Dietary Fiber: 2g
-
Total Sugars: 8g (Includes 0g added sugars)
-
Protein: 2g