Prep Time: 20 minutes
Cook Time: 15 minutes (custard base)
Chill Time: 4 hours (minimum)
Churn Time: 25–30 minutes (ice cream maker)
Hardening Time: 2–4 hours
Total Time: ~7 hours (mostly inactive)
Recipe Intensity: Moderate
Why moderate? You’ll need to temper egg yolks to create a custard without scrambling them. This requires steady attention for about 10 minutes. The rest of the process is waiting.
Yield: About 1.5 quarts (1.4 liters) | Servings: 12 (½-cup servings)
Why This Recipe Works
Skip the store-bought tubs filled with stabilizers and air. This homemade vanilla bean ice cream delivers a rich, dense, silk-textured scoop with real vanilla specks in every bite. The classic custard base (French-style) uses egg yolks for creaminess and depth that Philadelphia-style (no-egg) ice cream simply cannot match.
Ingredients
Amount Ingredient
2 cups Heavy cream (48% milk fat preferred)
1 cup Whole milk
¾ cup Granulated sugar
¼ tsp Fine sea salt
1 whole Vanilla bean (or 1 tbsp pure vanilla bean paste)
6 large Egg yolks (save whites for meringue)
1 tsp Pure vanilla extract (optional, for extra punch)
Intensity note: Using a real vanilla bean increases flavor depth but requires a small knife skill (splitting the pod). Intensity: Low.
Special Equipment Needed
Ice cream maker (bowl frozen for 24+ hours if using a freezer-bowl model)
Instant-read or candy thermometer
Fine-mesh strainer
Medium heavy-bottomed saucepan
Large heatproof bowl
Whisk
Rubber spatula
Plastic wrap
1.5-quart lidded freezer container
Step-by-Step Instructions (with Intensity Levels)
Phase 1: Infuse the Dairy (Intensity: Low)
Time: 5 minutes active + 30 minutes steeping
In a medium heavy-bottomed saucepan, combine 2 cups heavy cream, 1 cup whole milk, ¾ cup sugar, and ¼ tsp salt.
Split the vanilla bean lengthwise with a small knife. Use the back of the knife to scrape the black paste (seeds) from inside the pod.
Add both the seeds and the empty pod to the pot.
Warm over medium heat, stirring occasionally, until the mixture is hot and steaming but not boiling (about 175°F / 80°C).
Remove from heat, cover, and let steep for 30 minutes. This extracts maximum vanilla flavor.
Phase 2: Temper the Egg Yolks (Intensity: High – Pay Attention)
Time: 10 minutes
Bring a few inches of water to a simmer in a small pot for your double boiler setup (or use a heatproof bowl over simmering water).
In a large heatproof bowl, whisk 6 large egg yolks until they lighten slightly in color (about 2 minutes).
Re-warm the infused dairy until it’s hot again but not boiling.
Slowly drizzle about 1 cup of the hot cream mixture into the egg yolks, whisking constantly. This is tempering — it raises the yolk temperature without scrambling them.
Pour the warmed yolk mixture back into the saucepan with the remaining cream, whisking steadily.
Place the saucepan over medium-low heat. Stir constantly with a rubber spatula (scrape the bottom and corners).
Phase 3: Cook the Custard (Intensity: Moderate – Continuous Stirring)
Time: 8–10 minutes
Continue stirring until the custard thickens enough to coat the back of a spoon (nappé consistency).
Crucial test: Run your finger across the coated spoon. If the line holds clean and the custard does not run back together, it’s ready.
If you have a thermometer, target 170°F to 175°F (77°C-80°C). Do not exceed 185°F, or you risk scrambled eggs.
Immediately remove from heat.
Phase 4: Strain and Chill (Intensity: Low)
Time: 5 minutes active + 4 hours chilling
Set a fine-mesh strainer over a clean bowl. Pour the custard through (this catches any accidentally cooked egg bits and the vanilla pod).
Press the vanilla pod with a spoon to extract any remaining flavor, then discard the pod.
Stir in 1 tsp vanilla extract if using (this brightens the flavor after cooking).
Place plastic wrap directly onto the surface of the custard to prevent a skin from forming.
Refrigerate until completely cold — at least 4 hours, ideally overnight. Intensity: Zero (waiting only).
Phase 5: Churn (Intensity: Low – Machine Does the Work)
Time: 25–30 minutes
Pour the cold custard into your prepared ice cream maker.
Churn according to manufacturer’s instructions. The mixture will thicken and expand in volume.
The ice cream is done when it resembles soft-serve texture — it will pull away from the sides and hold a soft shape when you stop the machine.
Taste a small spoonful right now. This is your reward.
Phase 6: Harden (Intensity: Zero)
Time: 2–4 hours
Transfer the soft ice cream to a freezer-safe container.
Press a piece of parchment or wax paper directly onto the surface to prevent ice crystals.
Seal with a lid and freeze for at least 2 hours (4 hours for scoopable firmness).
The Final Product: What to Expect
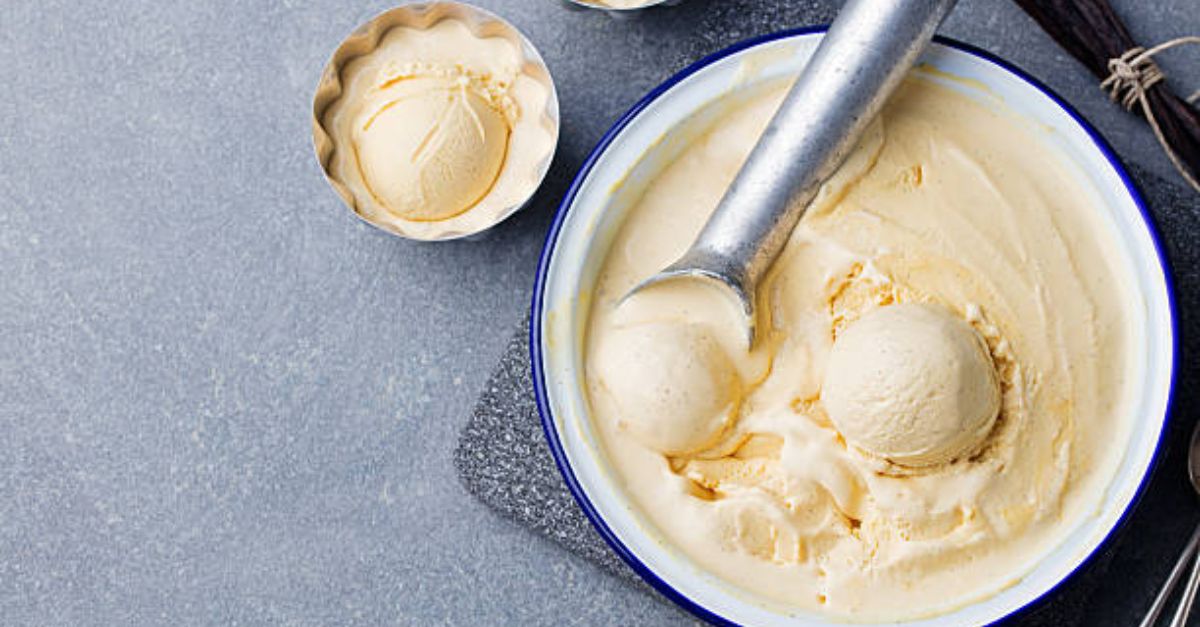
Appearance: Pale ivory with tiny black vanilla bean specks. Smooth, dense surface.
Texture: Creamy, rich, and scoopable straight from the freezer without the crumbly ice crystals found in cheaper brands. Melts slowly on the tongue.
Taste: Deep, floral vanilla notes with a balanced sweetness and a buttery finish. No artificial aftertaste.
Serving suggestion: Serve in chilled bowls or as a base for warm apple pie, brownies, or affogato (espresso poured over).
Storage: Keeps in a sealed container in the freezer for up to 2 weeks for best texture. After that, slight ice crystals may form.
Nutrition Information (per ½-cup serving)
Based on 12 servings from 1.5 quarts
Nutrient Amount
Calories 310 kcal
Total Fat 22 g
Saturated Fat 13 g
Trans Fat 0.5 g
Cholesterol 170 mg
Sodium 85 mg
Total Carbohydrate 24 g
Dietary Fiber 0 g
Total Sugars 23 g
Protein 4 g
Vitamin D 8% DV
Calcium 8% DV
Iron 2% DV
Potassium 100 mg