Total Time: 18 hours (mostly hands-off rising) | Active Time: 30 minutes | Difficulty: Beginner | Yield: 1 large loaf (about 12 slices)
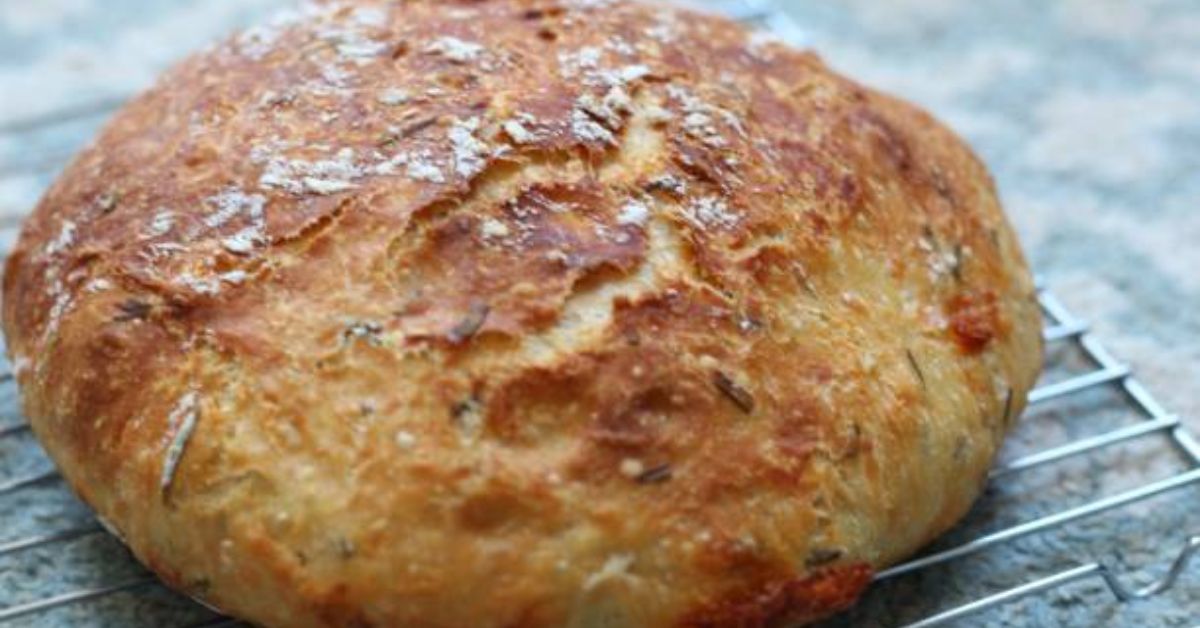
There’s a kind of magic in baking bread that requires no kneading, yet yields a crusty, artisanal loaf with an open, airy crumb. This No-Knead Garlic and Rosemary Bread is that magic, made simple. Infused with the aromatic punch of fresh garlic and the piney fragrance of rosemary, this bread transforms a humble mix of flour, water, yeast, and salt into a show-stopping centerpiece. The long, slow fermentation not only develops incredible depth of flavor but also does all the gluten development for you. It’s perfect for the novice baker looking for a guaranteed triumph or the seasoned cook wanting a reliably spectacular, low-effort loaf.
Nutritional Information (per slice, approx.)
-
Calories: 160 kcal
-
Carbohydrates: 32g
-
Protein: 5g
-
Fat: 1g
-
Saturated Fat: 0g
-
Fiber: 1g
-
Sodium: 195mg
Nutrition information is an estimate and may vary based on specific ingredients used.
Ingredients
-
3 ¼ cups (430g) bread flour, plus more for dusting
-
1 ½ teaspoons (7g) fine sea salt
-
½ teaspoon (2g) instant or active dry yeast
-
1 ½ cups (360ml) cool water (about 60-70°F / 15-21°C)
-
3 large cloves garlic, finely minced or pressed
-
2 tablespoons fresh rosemary, finely chopped
-
Extra virgin olive oil, for coating the bowl
-
Special Equipment: A 4 to 6-quart heavy Dutch oven or lidded pot (cast iron, enameled cast iron, or ceramic)
Instructions
Day 1: The Long Rise (5 minutes active)
-
Mix the Dough: In a large mixing bowl, whisk together the bread flour, salt, and yeast. Add the minced garlic and rosemary, and whisk again to distribute evenly. Pour in the cool water. Use a sturdy wooden spoon or your hands to mix until a shaggy, sticky dough forms and no dry flour remains. The dough will be quite wet and messy—this is perfect.
-
First Rise: Lightly oil a clean large bowl. Transfer the dough to the oiled bowl, turning it once to coat it lightly in oil. Cover the bowl tightly with plastic wrap or a damp kitchen towel. Let it rest at warm room temperature (about 70°F/21°C) for 12 to 18 hours. The dough is ready when it’s bubbly, roughly doubled in size, and the surface is dotted with tiny bubbles.
Day 2: Shaping, Second Rise & Baking (25 minutes active)
-
Shape the Loaf: After the long rise, generously dust a clean work surface with flour. Use a bowl scraper or wet hands to gently scrape the very loose, bubbly dough onto the floured surface. It will be extremely slack. With floured hands, gently fold the dough over onto itself from the north, south, east, and west—just 4 or 5 folds total—to form a rough ball. This is not a tight knead, just a gentle shaping.
-
Second Rise: Generously dust a clean kitchen towel (not terry cloth) or a proofing basket with flour. Place the dough ball seam-side down onto the towel. Dust the top lightly with more flour. Fold the towel over loosely to cover it. Let the dough rise for another 1 to 2 hours, until it’s puffy and nearly doubled. It’s ready when it slowly springs back if you gently poke it with a floured finger.
-
Preheat: About 45 minutes before the second rise is complete, place your Dutch oven (with its lid on) on the center rack of your oven. Preheat the oven to 450°F (230°C). It’s crucial that both the pot and the oven are fully, blazingly hot.
-
Score & Bake: Once the dough is ready and the oven is hot, carefully remove the preheated Dutch oven (it will be extremely hot!). Remove the lid. Uncover the dough and, in one confident motion, flip it seam-side up into the hot pot. The seam side is now the top. Don’t worry if it’s messy or lopsided; it will straighten out as it bakes (this is the “no-stress” method).
-
Bake Covered: Put the lid back on the Dutch oven and place it in the oven. Bake for 30 minutes.
-
Bake Uncovered: After 30 minutes, carefully remove the lid. The bread will be pale and puffed. Continue to bake, uncovered, for another 15 to 20 minutes, until the loaf is deeply golden brown, crusty, and sounds hollow when tapped on the bottom. An internal thermometer should read about 210°F (99°C).
-
Cool: Using oven mitts, carefully transfer the loaf to a wire cooling rack. This is the hardest but most important step: let the bread cool completely for at least 1 hour before slicing. The interior is still setting, and cutting too early will result in a gummy texture.